Editing Pages
Accessing the Editor
To edit your page, you can hit the gray “Edit” button under “Operations” on the Content Overview page or if you are already on the page itself, by clicking “Edit” in the top menu.
Once you do that, you’ll be inside your page editor. The top screen of the editor should look something like this.
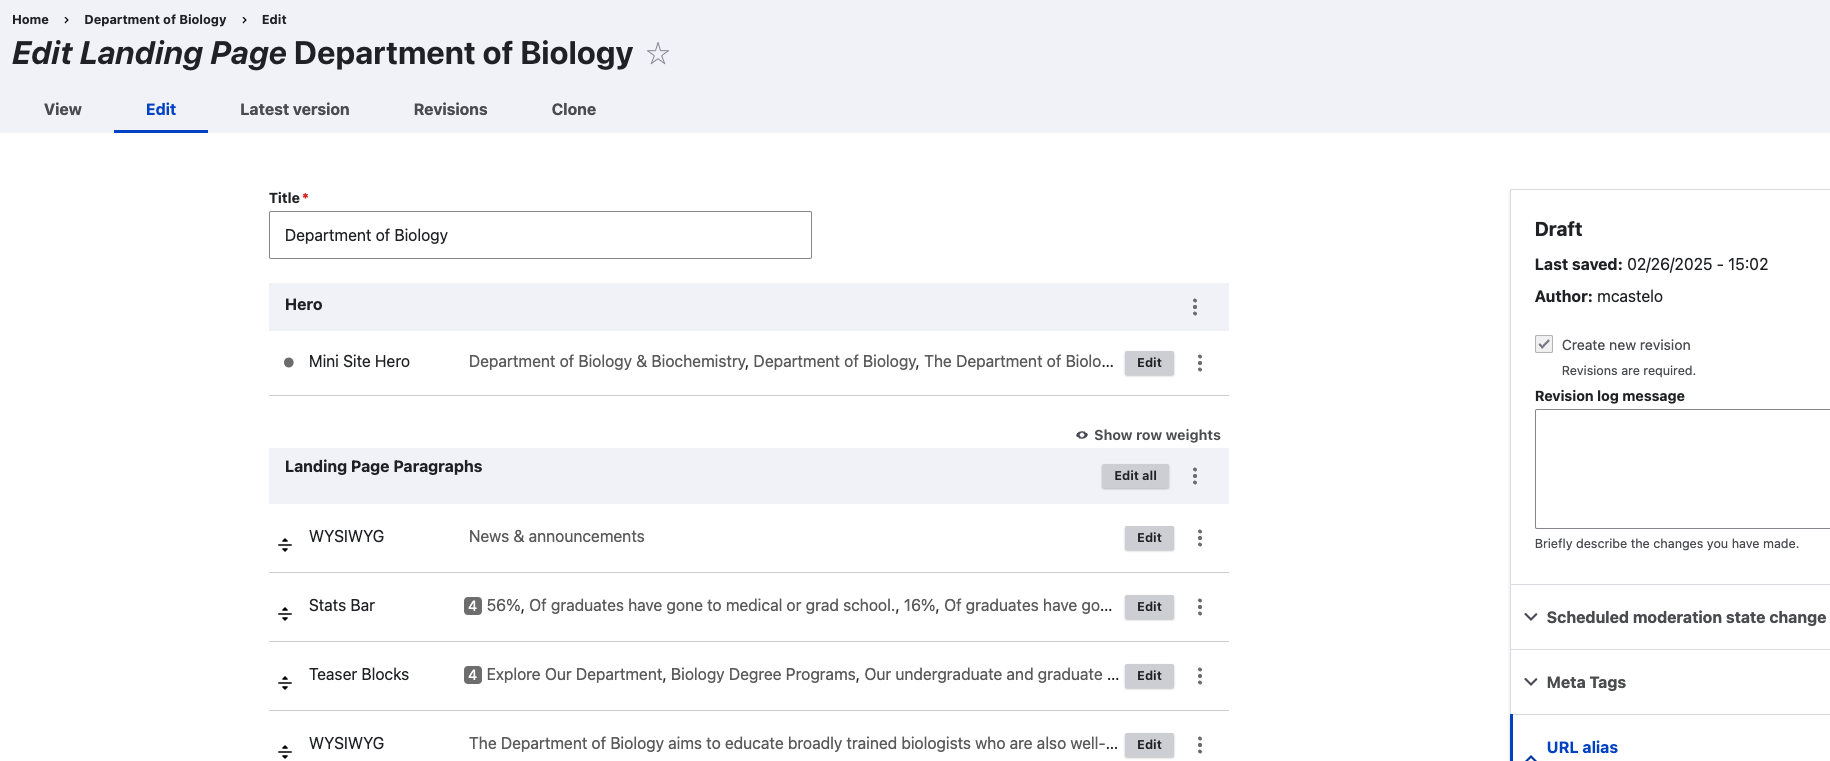
Page Editor Overview
Title
This will be the title of your page. It will show up to search engines as an <H1> tag. The title is crucial for SEO because it helps search engines understand the page’s content and improves its chances of ranking for relevant queries. A well-crafted title also attracts users in search results, increasing click-through rates and driving more traffic to the site.
Top Right Sidebar
In the top right corner you’ll get the following information:
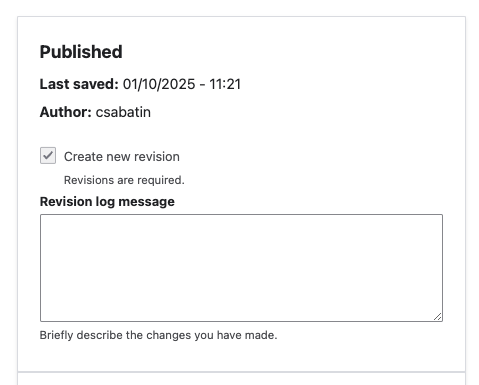
- Status of page: Draft or Published
- Last saved: Time and date when the last changes were made
- Revision log message: This is where you briefly note any changes made to the page. More detailed information on this is covered below.
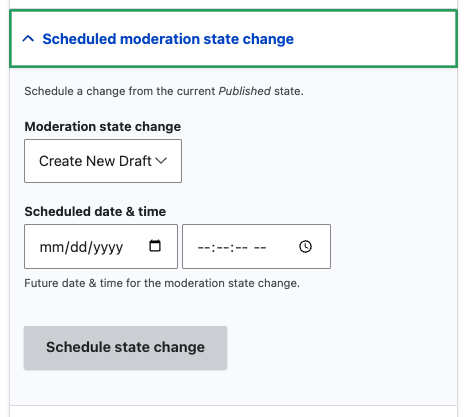
Scheduled Moderation State Change
This section allows you to schedule an update to the page’s status. This is useful when you have made changes to the page that you don't want to immediately publish, but would rather publish at a time in the future. This can also be used to turn the page back into draft mode:
However, if you have a page that needs to be removed from the live site, please submit a ticket to us. Let us know which page your existing URL should be redirected to so visitors who may be coming from search engines don't get an error message.
Meta Tags
When you create a new page or radically alter the content of an existing page, you must follow proper procedures for Meta Tags. Please click the link below for detailed instructions on creating and editing Meta Tags
Find Out How to Edit Meta Tags
URL Alias
This is where you create a specific URL for a new page. When you’re editing an existing page, you can leave this alone.
When you create a new page, you need to complete this section and enter a URL alias for the page. Our "Creating New Pages" chapter covers this more in-depth.
School/Minisite Theme
At the bottom of the left-hand column you’ll see “School Theme,” “Minisite Theme,” “Give Bar,” and “Chatbot.” The last two can be ignored.
School and/or Minisite Themes do not need to be changed when editing pages
When creating new pages, these become very important, and we’ll cover them elsewhere in the guide.
Status and Status Change
At the bottom, you’ll see “Current state:” This tells you if your page is published or is in draft mode. “Change to:” is where you select the status of your page - draft or published.
When you start editing a page, it's recommended that you immediately change the page status to "Draft." Your live page will still be available to visitors. Changing to "Draft" creates another version of the page where you can make changes and preview them without affecting the live page. Once you're ready for the changes to go live, you can use the "Publish" option in the drop-down to make the updated page visible to everyone. As we cover here, approval may be required before publishing.
Using the WYSIWYG Editor
The most common component used on our sites - and definitely on chaptered pages - is the WYSIWYG (What You See Is What You Get) component. This component allows you to add and format text, create links, and more — without needing to write HTML code. The WYSIWYG editor should feel familiar if you've used word processors like Google Docs or Microsoft Word,
Click the gray "Edit" button inside the WYSIWYG component to open the text editor.

Overview of the WYSIWYG Toolbar
At the top of the editor, you'll see a toolbar with various formatting options. Below is an overview of the most commonly used tools:
Basic Formatting Options
| Icon | Function |
| B | Bold – Makes text stand out. |
| I | Italics – Used for emphasis. |
| S | Strikethrough – Draws a line through text. |
| U | Underline – Use sparingly for readability. |
| 🔗 | Insert/Edit Link – Allows you to hyperlink text to another page or external website. |
Additional Formatting Tools
| Icon | Function |
| Blockquote | Formats text as a blockquote, used for emphasizing quotes. |
| (Image Icon) | Allows you to insert an image from the media library or upload a new one. More on this later. |
| (Horizontal Line) | Inserts a horizontal divider for separating sections of content. |
Text Styling & Layout
| Option | Function |
| Paragraph (Dropdown) | Controls text styling. Choose between Normal (Paragraph) and Heading styles (H2, H3, etc.). - H2 is used for main section headings. - H3 is used for sub-sections under an H2. |
| Styles (Dropdown) | These are custom styles available in your Drupal setup. Common options include: - “Inline Quote,” which formats a short inline quote, and “Red Button,” which adds a call-to-action button. 💡 Note: To use the "Red Button" style, you must first switch over the small dropdown in the lower left of the editor from "Basic HTML" to "Full HTML." |
| Alignment (Left, Center, Right, Justify) | Controls text and image alignment. |
| Source (<> Icon) | Allows you to switch between the WYSIWYG interface and the raw HTML code. |
The WYSIWYG editor also allows HTML editing in some modes. This can be set by choosing from the "Text format" dropdown. In most cases, you won't have to adjust this from Basic HTML, unless you are adding a button (more on that below) or are experienced in HTML.
- Basic HTML: Allows a small set of safe, simple formatting (like bold, links, lists).
- Restricted HTML: Even stricter than Basic — usually just plain text with very little or no formatting.
- CKEditor: The visual editor (what-you-see-is-what-you-get, or WYSIWYG) that lets you format text without writing HTML manually.
- Full HTML: Allows almost all HTML tags, including complex ones (good for advanced layouts, embeds, etc. — but riskier if not used carefully).
Using the WYSIWYG Editor
-
You’ll frequently copy and paste text from sources like Word, a PDF, Google Docs, or another webpage. If you copy and paste straight from these sources into the WYSIWYG box, in some cases this will cause your text to inherit the styles of its source, which can lead to formatting issues on your page.
Always paste as plain text as follows:- On a PC: Paste by holding down “Control” + “Shift” + “V”
- On a Mac: Paste by holding down “Command” + “Shift” + “V”
Alternatively, you can also use the free, online tool HTML Cleaner. Copy the text you wish to enter into the WYSIWYG editor into the tool, click "Clean HTML," and you'll get a clean version of your text that you can paste into the editor
-
Any image entered into the WYSIWYG editor will be the full width of its section. This is a known bug and we have workarounds to wrap text around a smaller image. Just put in a Web ticket and we can help.
For detailed instructions regarding images, please refer to this section/page of the guide.
-
- Highlight the text you want to turn into a link.
- Click the link icon in the toolbar to open the link popup.
- Add the link URL. You will be linked to another page or a shared Google Drive document.
- Check the green checkmark.
Note: If you want to turn an email address into a link, simply add the text "mailto:" in front of the email address when adding the link URL in the link popup. For example, "mailto:webs@sju.edu."
-
You can turn any text link into a button within the WYSIWYG editor.
- Go to the dropdown menu underneath the WYSIWYG which reads “Basic HTML” and change it to “Full HTML.”
- Highlight the hyperlink you want to turn into a button.
- Go to the “Styles” dropdown menu and select “Red Button.”
- The button will still look like a plain text link in the editor; however, it will be a button when you preview your page.
💡 Note: If the button does not appear, make sure you’ve completed Step #1.
Additional Guides to the WYSIWYG:
Saving and Previewing
After making your edits, you must save your work as a draft before publishing. This lets you preview how the content will look to visitors without affecting the live site.
- Scroll to the bottom of the editor.
- Locate the "Change to:" dropdown and select “Draft.”
- Click “Save” to store your changes.
- This will take you to a preview of your changes.
- 💡 Note: The live version of our site will remain the same.
- Review the preview carefully—check for formatting errors, unexpected layout changes, and typos.
To return to editing mode, scroll to the top and click "Edit" in the white navigation area.
Once you’ve reviewed everything and are satisfied with the changes, you can proceed with publishing if approval is not required. Simply flip the dropdown setting to "Publish" and hit save.
Filling in the Revision Log
Before saving your changes, it's critical to add a revision log message. This helps track what changes were made and why, which is especially useful for content management and troubleshooting.
How to Add a Revision Log Message
- Scroll to the top of the page editor.
- Locate the "Revision log message" text box.
- Enter a brief, clear summary of the changes you made.
Examples of Good Revision Messages
- “Added a new chapter for program requirements.”
- “Updated faculty bios in the ‘Meet the Team’ section.”
- “Revised outdated text in the ‘Majors’ section.”
- “Added a full-width CTA component at the bottom of the page.”
Good revision log messages also help you know who's been revising the pages. The web team makes a note of every edit they make to pages, and you'll often see our revision log messages in there.
This log helps you and your colleagues track updates and becomes a much-needed reference if a rollback is needed. It’s also useful if multiple editors work on the same pages and helps the web team when diagnosing issues.
Getting Approval to Publish
In some cases, you can publish minor changes without requiring approval. However, every department and administrative office is different. Most require prior approval of department or office heads or other personnel before publishing.
Send them an email containing a link to the draft version. You’ll see a URL that isn’t the title of the page broken up by hyphens, but something that looks like this: https://www.sju.edu/node/58056/latest
Ask them for a quick review and the changes that need to be made before publishing.
They will, however, need to be logged into the site to see your changes in draft mode. If they require access to the site, submit a ticket, and we will assign them “viewer” status. They won’t be able to edit pages themselves.
Publishing & Unpublishing
Once you are satisfied with your change, have received any necessary approvals and have noted the changes you have made in the revision log:
- Toggle the "Change to:" dropdown to "Published".
- Click “Save” to make the changes live.
If you are publishing a new page and want it added to your site's menu, please visit this part of the guide.
In the event you wish for a page to be permanently removed from the site, please send us a web ticket, and we'll take care of it for you.
Schedule for a Later Date
If you want your edits to go live at a date in the future, Drupal provides a scheduling option. To schedule changes:
- Click the “Scheduled moderation state change” in the right sidebar
- Select the desired action (Set as “Create New Draft” or “Publish”).
- Enter the date and time you want the change to take effect.
- Save your settings, and Drupal will automatically publish or archive the page at the specified time.
This feature is useful for planning content updates and ensuring timely publishing without manual intervention.
Revert Back to Prior Version
What happens if you get yourself in a situation where you feel you need to start over? Or the changes that you made weren’t supposed to go live yet? Drupal’s Revisions feature allows you to restore previous versions if needed.
💡 Note: The edits you made to the draft or published version of your updated page will be gone once you do this.
To revert to a previous version of a page, click on the “Revisions” tab at the top of the page

You’ll see a list of all saved versions of the page, showing timestamps and user names of those who made edits. Click the date and time of the revision you want to check. This allows you to review the content before reverting.
Click “Revert“ next to the desired revision. Confirm the action when prompted. Add a revision log message to document why the change was made.
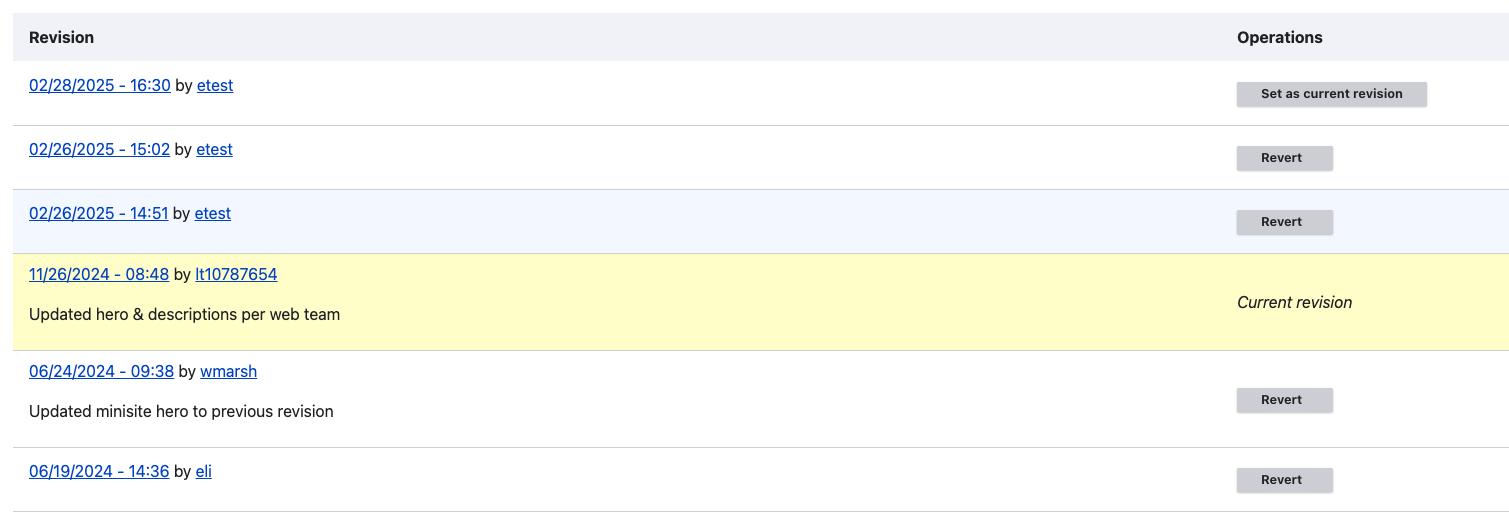
After reverting, the page will return to the selected previous version. Click “Save” to finalize the change.
< Return to Managing Your Site Learn How to Edit Landing Pages >